The Redirect module is an essential tool for managing URL redirects in Drupal. It helps site administrators improve user experience and search engine optimization (SEO) by efficiently handling outdated or incorrect URLs. With its powerful features, the Redirect module is a go-to solution for managing URL changes and avoiding broken links on your site. (https://drupal.org/project/redirect)
Benefits and Features
Benefits:
- SEO Optimization: Prevents 404 errors, helping search engines and users find content easily.
- Improved User Experience: Redirects users to the correct page automatically.
- Content Management Flexibility: Handles URL changes seamlessly during site restructuring.
- Analytics Tracking: Log and monitor redirect activity for insights.
Features:
- Create and manage manual redirects easily.
- Automatically create redirects when paths are updated.
- Support for 301 (permanent) and 302 (temporary) redirects.
- Integration with the Pathauto module for streamlined path management.
- Redirect logging for tracking and debugging.
Installation
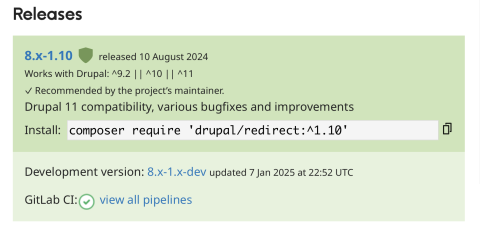
Head over to https://drupal.org/project/redirect. Go to the bottom of the page and click on the copy icon for the version of the module that works with your version of Drupal and is recommended by the project maintainer.

Configuration
Step 1: Access Redirect Settings
- Navigate to Configuration > URL redirects from the admin menu.
- Click "Add redirect" to create a new redirect.
Step 2: Create a Redirect
- Source Path: Enter the old or incorrect URL path (relative to the site root, e.g.,
old-page). - Redirect To: Specify the destination URL or select an internal path from the content list.
- Redirect Status:
- Choose "301 Moved Permanently" for permanent redirects.
- Choose "302 Found" for temporary redirects.
- Save the redirect.
Step 3: Manage Redirects
- View and edit existing redirects from the main Redirect page.
- Use the filters to search for specific redirects.
Step 4: Enable Automatic Redirects (Optional)
- Navigate to Configuration > Search and Metadata > URL redirects.
- Enable "Automatically create redirects when URL aliases are changed."
- Save configuration.
Using the Redirect Module
Managing Bulk Redirects
- Use the bulk upload feature by importing redirects from a CSV file.
- Format the CSV with columns for "Source" and "Redirect to."
Debugging Redirects
- Check the redirect logs to ensure they are functioning as expected.
- Navigate to the Reports > Recent log messages to view redirect-related events.
Best Practices
- Avoid Redirect Chains: Ensure that each redirect goes directly to the final destination without multiple hops.
- Use Descriptive Paths: Keep paths user-friendly and SEO-optimized for better search engine indexing.
- Test Redirects: Always test redirects in a staging environment before applying them to a live site.
Use Case Scenarios
1. URL Restructuring During Migration
When migrating content to a new site structure, use the Redirect module to map old URLs to new ones. This ensures continuity for users and search engines.
2. Handling Deleted Content
For content that has been removed, redirect visitors to a relevant page (e.g., the homepage or a related article) instead of displaying a 404 error.
3. Marketing Campaigns
Set up short, user-friendly URLs for marketing campaigns (or your own URL redirect service like https://rodsurl.com ) and redirect them to the full landing page URLs for better tracking and user experience.
This video will show you how to create your own URL Redirect service!
